AWS Machine Learning Blog
Optimizing application performance with Amazon CodeGuru Profiler
Amazon CodeGuru (Preview) is a service launched at AWS re:Invent 2019 that analyzes the performance characteristics of your application and provides automatic recommendations on ways to improve. It does this by profiling your application’s runtime (with CodeGuru Profiler) and by automatically reviewing source code changes (with CodeGuru Reviewer). For more information, see What Is Amazon CodeGuru Profiler?
This post gives a high-level overview of how CodeGuru Profiler works, common ways to use it, and how to improve your understanding of your application’s performance in production. It assumes a basic knowledge of the JVM (Java Virtual Machine) and related concepts such as threads and call stacks.
Why use CodeGuru Profiler?
CodeGuru Profiler provides insights into your application’s runtime performance with a continuous, always-running production profiler. It collects data from your application’s runtime on what threads are currently running and what code those threads are executing. CodeGuru Profiler provides visualizations to help you understand your application’s execution and automatic recommendations on how to optimize it. These recommendations focus on reducing CPU utilization and application latency to reduce infrastructure costs and give your customers a snappier experience.
These optimizations can result in significant cost savings when you apply them to large fleets. Within Amazon, CodeGuru Profiler is running in over 80,000 applications and has resulted in tens of millions of dollars of savings with the suggested optimizations. It is also consistently used to analyze operational issues and their impact on performance.
Overview of CodeGuru Profiler
CodeGuru Profiler consists of three main components:
- Agent – Runs inside your application polling its current runtime state and submits this data to CodeGuru Profiler
- Console – Provides visualizations into your data and recommendations for potential improvements
- API – Allows management of profiling groups and retrieving profiles and recommendations
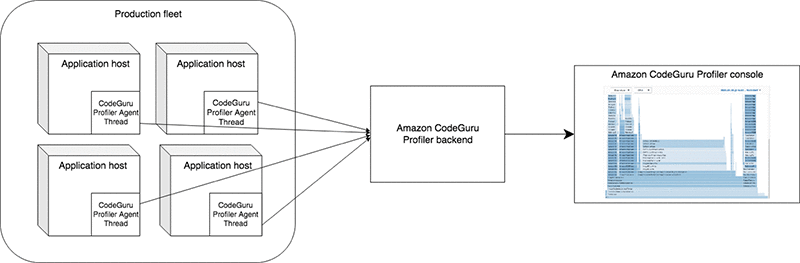
CodeGuru Profiler currently provides an agent designed for use with JVM applications (you can profile Java, Kotlin, and Scala, but CodeGuru tailors most of its recommendations to Java). When you start the agent in your application, the agent spawns a new thread in your JVM on all the instances in your application’s fleet. Every second (by default), the agent thread wakes up and asks the JVM for a stack-trace of what each thread (or a subset of threads) in the JVM is currently doing and what each thread’s current state is.
Every 5 minutes (by default), the agent sends a summary of this information (a profile) to the CodeGuru Profiler backend service. The profiles from all your hosts are aggregated together into 5-minute periods. You can view individual 5-minute periods, but often 1-hour or 1-day periods are better for more accurate profiles because it provides more statistically-sound results. The following diagram illustrates this workflow.
You can then visualize the profiles that belong to your application with CodeGuru Profiler. There are multiple ways to visualize the performance of your application; this post reviews some of the basics. After the CodeGuru Profiler analyzer runs, the console provides access to recommendations on ways to improve your application’s performance. These recommendations provide context on the size of the potential optimization to help you prioritize investigations, and give tried-and-tested steps to reduce or remove the performance impact of the detected issue.
Deploying CodeGuru Profiler
It is recommended to run CodeGuru Profiler in an environment with production (real customer) traffic to get a realistic view of your application’s behavior. It can also be useful to run it in a pre-production environment to test for any performance changes before releasing changes into production. Profiling production software is the best way to make sure that time you spend optimizing actually leads to significant improvements in real-world efficiency.
In terms of impact on your service, the CodeGuru Profiler agent usually adds less than 1% CPU usage overhead to applications and uses a maximum of 100 MB of memory. You should run through your normal QA or release process when you add the CodeGuru Profiler agent. This should give you a chance to check data is being submitted correctly, and that it has no impact on your application’s key metrics.
Organizing your applications into profiling groups
Profiling groups are CodeGuru Profiler’s way of grouping together multiple instances of your application into a single aggregated profile. The most common use case of this is to merge the profiles from several hosts in the same fleet that all run the same application.
A profiling group usually represents an application, although how you define an application is mostly a stylistic decision. It’s common to profile multiple related APIs as a single application (and therefore a single profiling group), although if APIs are completely unrelated, you may end up with clearer and more readable profiles by separating them into different profiling groups.
The following is a suggested pattern to follow for your profiling groups:
- Use separate profiling groups for each application. If you have different applications for different purposes, they likely shouldn’t be sharing a profiling group because that may reduce the clarity of your visualizations.
- Use separate profiling groups for each Region of an application. This allows you to compare the behavior of Regions, which can be useful for diagnosing operational issues that affect particular Regions of your application.
- Use separate profiling groups for each stage of an application. Testing and staging environments should not submit profiles to the same profiling group as your production service. Most synthetic test environments do not perfectly emulate production environments (both in terms of data and code) and therefore have different performance characteristics.
These recommendations lead to profiling group names that look like <my-application>-eu-west-1-beta and <my-application>-us-west-2-prod.
Getting started with CodeGuru Profiler
The following example demonstrates what you can expect from onboarding an application with CodeGuru Profiler, and the visualizations and recommendations you get out of it. For more information, see Setting Up Amazon CodeGuru Profiler. The procedure includes the following steps:
- Create a profiling group. You can do this easily through the CodeGuru Profiler console.
- Give your application IAM permissions to submit to CodeGuru. Your application needs to have the IAM permissions for submitting profiles and configuring the agent. The following example code gives these permissions; you just need to add the Region, account ID, and profiling group name:
- Add the agent as a dependency to your application. If your application uses Maven or Gradle, follow the instructions provided in the documentation. Otherwise, you may need to import the agent JAR to your build system manually.
- Start the profiler when your application starts. Add a few lines of code to your application’s startup to configure which profiling group and Region to submit profile data to and any credentials required to assume the role you configured earlier. The following example code shows what this might look like (while CodeGuru is in preview, these APIs are subject to change):
After you deploy your newly onboarded application, a profile is submitted after 5 minutes of profiling. It can take up to 15 minutes to aggregate profiles from all your hosts, after which you can see your first visualization in the CodeGuru Profiler console. The granularity of the first visualization depends on how active your application was during those first 5 minutes of profiling—an application that is idle most of the time doesn’t have many data points to plot in the default visualization. However, you can remedy this by looking at a wider time period of profiled data, for example, a day or even up to a week if your application has very low CPU utilization.
It takes up to 24 hours to generate your first recommendation report. Recommendation accuracy increases with the amount of profiled data you analyze. It is recommended to continue profiling your application continuously during this period (and afterward if you want to receive updated recommendations).
Your report highlights any potential optimizations that CodeGuru Profiler has identified and provides steps on how to carry out the recommended changes. If your report doesn’t contain any recommendations, your application doesn’t have any performance issues that CodeGuru Profiler has recognized. However, it’s worth checking back in the future as CodeGuru Profiler learns to recognize new issues and as your application changes over time.
Understanding CodeGuru Profiler’s visualizations
I’ll now go through an example of how I can use CodeGuru Profiler to optimize my application. After onboarding my application to CodeGuru Profiler, I get my first glimpse into the runtime performance of my application. This type of visualization is often called a flame graph, and it can be a very powerful tool as a complement to logs and metrics.
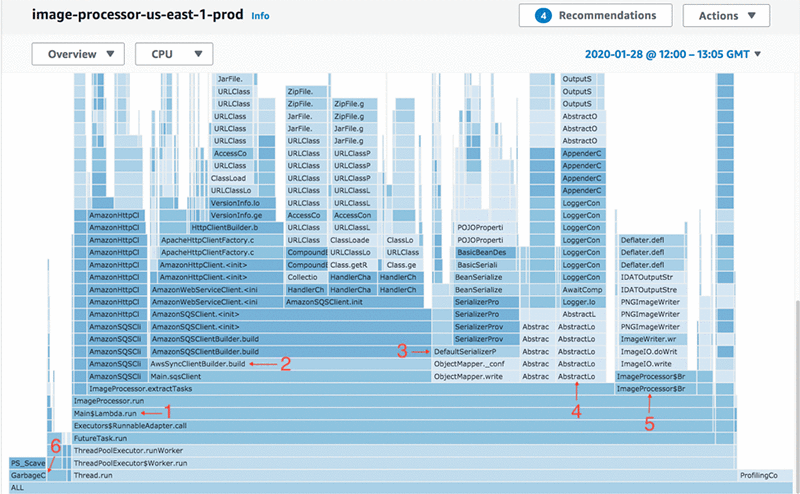
The easiest way to approach a flame graph is to find some frames you are familiar with – often the entry point of your application is a good place to start. For this post, Main (1 on the preceding screenshot) is the starting point of my application, and ImageProcessor (just above Main) is the class that contains most of the business logic.
Digging into the visualization, there are mentions of Amazon SQS in the middle of the graph (2). On the right of that, you can see some time spent serializing objects (3), some logging (4), and then some image-processing frames near the right edge (5). In the very bottom left, there are some garbage collection frames (6). Overall, this makes sense because my application uses the Amazon S3 and Amazon SQS Java clients, and also some image-processing libraries.
To work with flame graphs effectively, you need to understand the basics of how to read them. Each rectangle is a frame, which represents a method call at a particular location in the call stack. Frames directly above correspond to methods called by this frame (sometimes known as callees), and frames below are what called this frame (callers). For example, for the AwsSyncClientBuilder.build frame (2), you can see it was called by Main.sqsClient (the frame below 2), and it only calls AmazonSyncClientBuilder.build (the frame above 2). This lets you piece together the hierarchy of calls throughout the application.
The width of each frame corresponds to the percentage of CPU time that method used: the wider the frame, the more time spent executing that method and the methods it calls. When navigating a flame graph, it’s often worth looking at the widest frames first and making sure you understand why those frames are taking up most of your CPU’s time.
When the agent samples a JVM thread, the thread can be one of several thread states. CodeGuru Profiler maps these into the following states:
- Runnable – The thread was executing when it was sampled. This means it was either running or scheduled to be run.
- Blocked – The thread was waiting to enter a Java synchronized block or waiting for a monitor, but another thread was currently executing or holding it and prevented this thread from executing.
- Waiting – The thread was waiting for a signal from another thread. This is a very common thread state when working with network requests, disk I/O, and
notify()andnotifyAll()calls. - Timed Waiting – Similar to
Waiting, with the exception that the wait has a timeout, for example, sleeping with a timeout. - Idle – The thread did not have any impact on CPU or latency. For example, a thread pool waiting for new requests.
- Native – The thread was sampled while it was executing native code via the Java Native Interface (JNI). CodeGuru Profiler maps some known native frames to the other thread states where it knows what the frame is doing, but if frames are left in the Native state, it means you have no information on whether the thread was running or waiting.
For more information about thread states, see Get Thread State in the JVM Tool Interface website.
Another useful concept is that of wall clock time and CPU time. Wall clock time refers to how much real-world time has passed while executing code (or waiting for something). In contrast, CPU time reflects how many CPU cycles it took to complete an operation. Wall clock time includes time spent waiting for networks, disk I/O, and other threads to finish. The difference between these two is especially important in request/response-style applications where you want to minimize latency.
This default visualization is called CPU mode. It only shows information from frames that were in the Runnable, Blocked, and Native thread states, and doesn’t make a distinction between these three states. They give a good idea of what your hosts’ CPU was busy doing, which is useful if you want to reduce CPU utilization, perhaps with the end goal of downsizing your fleet.
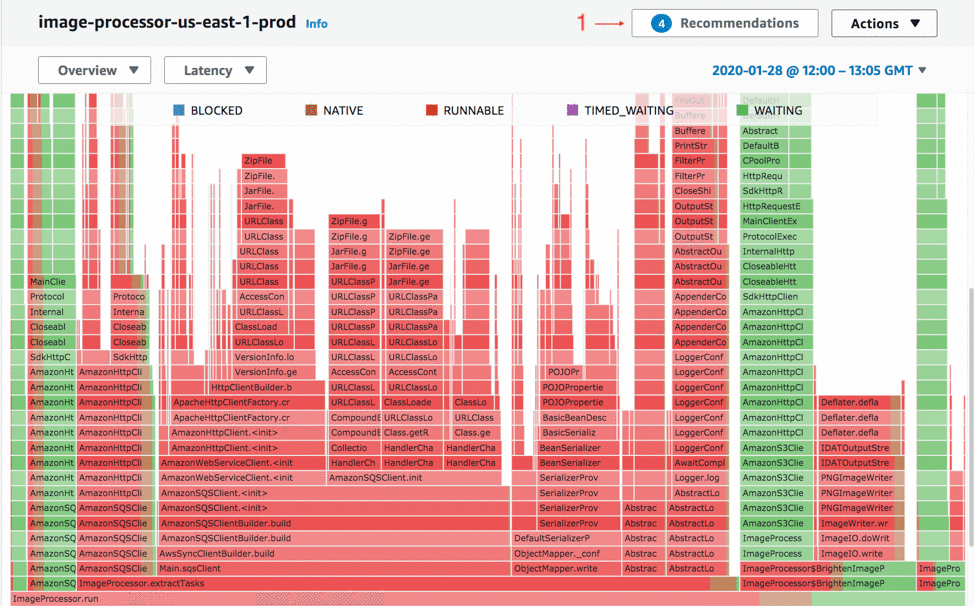
You can view some of the other thread states by changing to Latency mode. This includes all the thread states except Idle, and you can use it to get a good idea of what is impacting the wall clock time of the application. The following screenshot is of the flame graph in Latency mode, which now includes network and disk I/O. In this case, the application still spends most of its time in ImageProcessor.extractTasks (second bottom row) and almost all the time inside that is Runnable, which means that it wasn’t waiting for anything.
Recommendation reports and optimizations
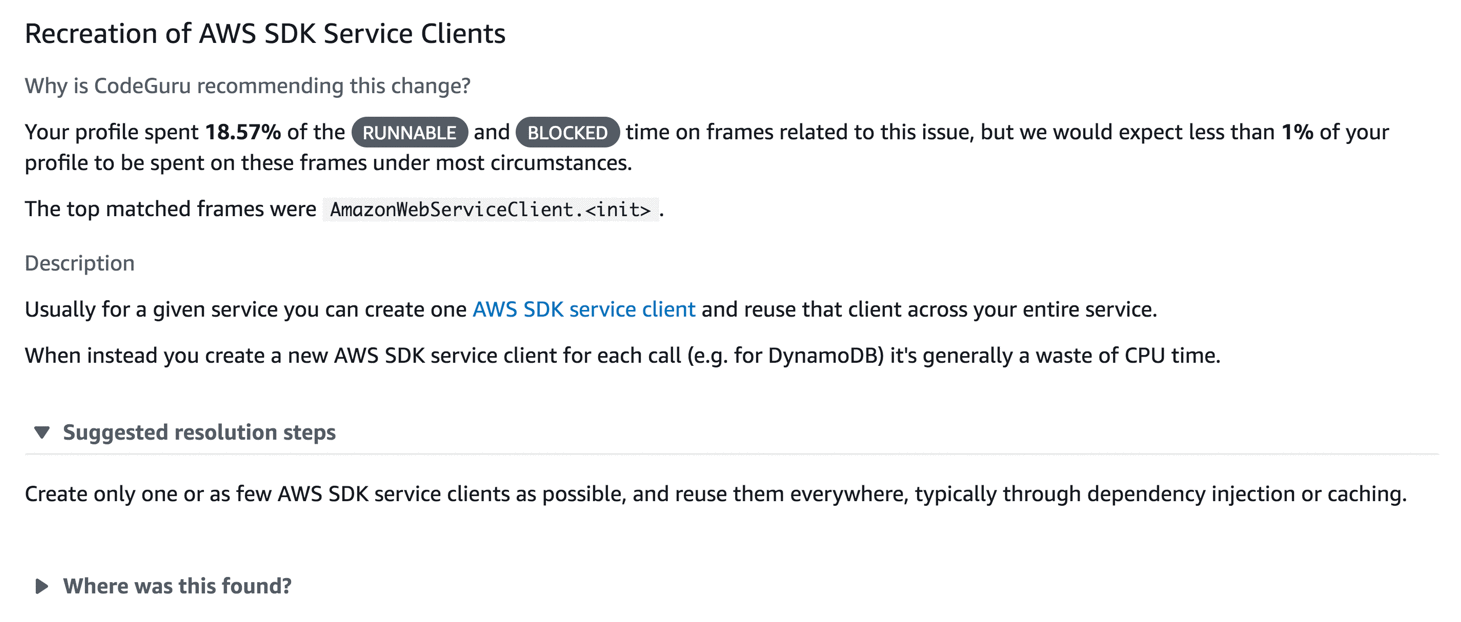
The preceding screenshot shows a button at the top (1), which indicates that CodeGuru Profiler has four recommendations. When you choose Recommendations, you will see the recommendation report for this profile. The following screenshot shows one of the recommendations for the application I’m showing. One of the things it highlights is that the application spent 18.57% of its CPU time creating new AWS SDK clients. CodeGuru Profiler says it expects this to be less than 1% of CPU time in most applications, and that you should be reusing the clients as much as possible.
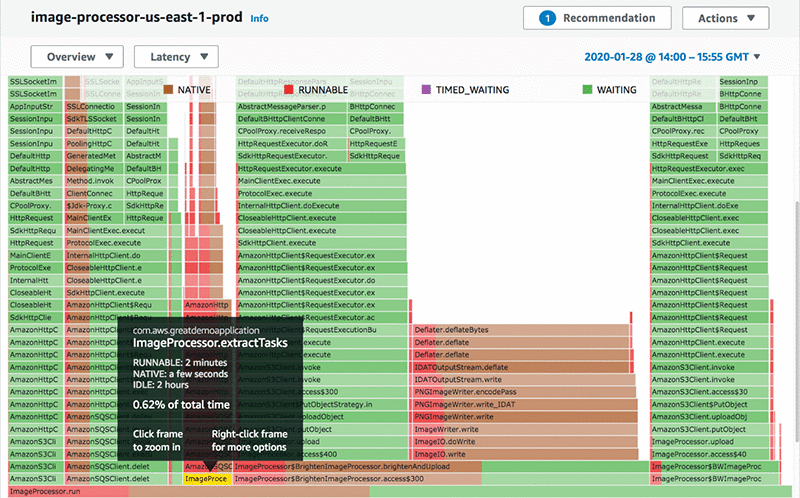
For this use case, there is no good reason not to reuse the SDK client. So, I made a change to cache the Amazon SQS client between requests and deployed this change. The following screenshot shows the updated profile in Latency mode. Much less of the profile is in the Runnable state and more is in the Waiting state, which means a larger percentage of the profile is spent doing network operations, and a lot less on (evidently) useless CPU operations. For comparison, in the screenshot below I have hovered over the ImageProcessor.extractTasks frame that was most of the Runnable time in the previous flame graph. It is now only 0.62% of the total profiled time, down from 14.70%, which is an excellent improvement.
As a result of this optimization, the application’s latency on each request has reduced, which makes my customers happier. I could also reduce the number of CPU cores on the host running this application, which saves my team some money. If I were to continue optimizing, I might think about how to increase network throughput by parallelizing requests, or even caching them, if possible.
Conclusion
This post explained the slightly-below-surface-level concepts of CodeGuru Profiler. It touched on what the agent does, why profiling in production is a good idea for most applications, and how to set up your profiling groups. It also went through a brief example of how to interpret a flame graph and use recommendations for optimizing.
Check back in the future for more posts covering topics such as a deeper dive into the JVM agent, a more detailed look into the flame graph visualization, and how to use CodeGuru Profiler to optimize different types of applications.
You can get started with CodeGuru Profiler by visiting the CodeGuru console.
About the Author
 Isaac Jordan is a Software Development Engineer in the Amazon CodeGuru Profiler team in London. He was previously an SDE for Amazon Advertising, and loves thinking about Amazon products from a customer’s perspective.